Wednesday, July 25, 2012

Floral Jacquard Dress Revisited

One of my favorite past projects is Carolina Herrera inspired dress (blogged here). I enjoyed every second of the project: buying the fabric, analyzing the details, adapting the patterns, making the muslins, and assembling the dress.


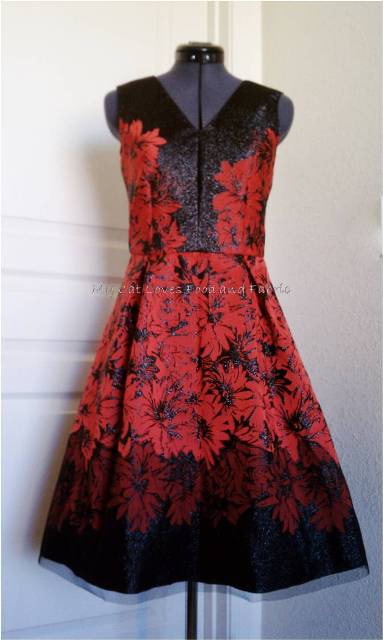
When I posted the picture of this dress on a sewing forum, Stitcher's guild, under the title: McCall"s 5466 + Vogue 8555 Dress, Kathryn of I Made This! said - "The way you added the netting at the hem area of the red/black dress for a faux ombré look is pure genius. "

Did she say ombré look?

I have to admit that I had never noticed that the netting gave the dress an ombré look. All my attention was given to the details like where the seams were, how the prints were oriented, etc. I was not seeing the forest for the trees, wasn't I? Well, that was my Aha! moment. (Thanks, Kathryn!)

So I told myself: When it comes to analyzing the design, looking at it from a distance is as important as examining the details.

Since I never had a chance to look at the original CH dress, I could only imagine how the netting was applied. Having said that, here is what I did for my dress: I basted the netting to the hem of the dress, sewed it using tiny zigzag stitches along the flower design, and cut the netting above the stitching line.


Adding the netting or sheer to the border-print fabric to create ombré look is indeed a brilliant idea. I cannot wait to use this technique -which I would have never known if I did not knock off CH dress - in the future. 


Parting shots: Sleeping kitties - don't we love cat's funny sleeping position? :)

Leo sleeping on the ironing board, using the fabric origami iris (blogged here) as his pillow.


Chester likes to sleep right in front of me when I study. I have been studying for the coming actuarial exam since my last post: Philosophy di Alberta Ferretti inspired coat has zero progress because of that...


Baby Leo :)


Until next time, cheers to you all!

Tuesday, July 17, 2012

Making Origami Iris

As I promised yesterday I would like to share how I made the origami iris. I had never made fabric origami before so there may be a better way to do this, yet I believe sharing is a good thing. :) Therefore this is a record of how I did it rather than a tutorial.


1. You need a square cut of fabric. The side of the fabric shown is 24.5"/62cm. It makes a big iris (16.5"/42cm wide).
2. Fold wrong side together to make a triangle.
3. Fold it again. 
4. Rotate the triangle so that the long side faces toward you. Lift the top layer at the center point of the long side. Open it out and make a square.
*Red line indicates upside-down V-shape fold which is called mountain fold.


6. Repeat step 5 on the other side. 
*White line indicates V-shape fold which is called valley fold.

7. Open out a square and make a diamond shape. Repeat on the other side.


8. Fold the right flap to the left to reveal the smaller triangle. Repeat on the other side.


9. Open out one flap.

10. Reach inside the 'pouch' and pull it out. Repeat on the other side.


11. Fold the top flap down so that the smooth surface shows. Fold the top and bottom corners of the diamond as shown. Note that the left corner is open and the right corner is closed.


12. You are almost done! You need to secure some points before open up the petals. Hand sew where two folded corners meet with thread. 
13. Sew the side.
14. Sew all through the fabric near the center.
15. Now open the petals to make it bloom!

For the best result you may want to support the fabric (even the canvas fabric seems somewhat wimpy to hold its shape) by interfacing, starch, etc. and press as you go.  


Until next time, cheers to you all!

Monday, July 16, 2012

Fabric Origami Iris

After reading Rhonda's Monday Morning Inspiration today, I had an urge to make an origami iris just like John Galliano did for Dior in 2007. Seeing the iris must have unlocked memories from my childhood; many details of my preschool classroom in Japan suddenly flashed back. (It was like the movie Amelie.) I felt like I was four years old once again, making origami with my friends and two young female teachers in the yellow-themed classroom. Wow.

Here is Dior's iris:
Source: style.com
 This is what I made:

I used the cotton canvas from my 'what-was-I-thinking' stash for this experiment. Yes, it turned out quite big :) but I was happy that I still remembered how to make an iris. I will post its process next time.
*UPDATE: You can read about how I made the iris here.

Until then, cheers to you all!

Wednesday, July 11, 2012

Chocolate Chip Cookie for Sewing Break

I believe in chocolate. :) Something chocolaty is almost always in my house. You know, chocolate is said to be a brain food (Boosting Brain Power -- With Chocolate" on ScienceDaily). I love combining chocolate with nuts when I use it for baking. Today I would like to share this wonderful chocolate chip cookie recipe I found on the internet.


The original recipe is by Alice Currah. She posted her "The Best Chocolate Chip Cookie Recipe EVER!" on her blog Savory Sweet Life with many helpful hints and pictures. You can check it out here. 

Alice's recipe produces perfect American chocolate chip cookie which is crisp outside and chewy inside. My version is more like a shortbread which I love. Here is the ingredients I used to make these cookies today. I used less sugar and chocolate chips and added walnuts. I highlighted the changes I made.

1 cup (2 sticks) unsalted butter, softened
1 cup sugar
2 eggs
2 tsp. vanilla extract
2 3/4 cups (12 oz) all-purpose flour
3/4 tsp. coarse sea salt  *Sea salt makes difference!
1 tsp. baking soda
1 1/2 tsp. baking powder
6 oz semi-sweet chocolate chips mini
1 1/2 cup chopped walnuts, roasted

1. I creamed the butter and sugar, added eggs and vanilla, and mixed well.

2. I added flour, sea salt, baking soda, and baking powder, mixed about half way. Then I added chocolate chips and walnuts and mixed all the way.

3. I made a ball with 3~4 tbsp of dough (actually I just randomly grabbed the dough so I am only guessing) and pushed it gently so that it was about 3/4" high.


4. I baked in a preheated oven at 360F for 16 minutes. It made 20 big chunky cookies.


5. Perhaps it is best to store these cookies in an air-tight container.


Enjoy!

Monday, July 9, 2012

PDAF Coat Muslin


Hello everyone! How have you been? I had been muslin-ing since my last post. I made the fourth (!) muslin this afternoon and I could finally give it a "good-enough" status. Whew! Considering how much amount of time I already dedicated to this project, this got to be a real love!

Now, meet my love - Philosophy di Alberta Ferretti.

Source: shopbop.com

First time I saw this coat was last winter. I thought it was a perfect casual coat for cold days. It was made from wool 90% cashmere 10% fabric.

Source: stylebop.com

Source: stylebop.com

This coat has princess seams in both front and back, two-piece sleeves, and flap pockets. Burda Style 8292 looked like a good starting point.


Source: simplicity.com

I also noticed that there was no side seams.

Source: stylebop.com

I combined side front and side back pattern pieces together. My first obstacle was fitting the bodice back. The smallest size of this pattern was 10. My usual pattern size is either 6 or 8. So it was bigger than me from the beginning. Plus I almost always have to adjust pattern for my thin shoulder and back. I tweaked the princess seams forever.

My second trouble was an enormous amount of ease in a sleeve cap. I reduced the sleeve-cap height by 5/8" for the second muslin. The sleeves hung right but the sleeve cap still looked too much ease in it. For the third muslin I took additional 1/2" off. The result? The sleeves did not hang right and looked twisted. Ouch! After un-reducing some change, the final sleeve-cap height became original number -3/8".

Here is my final muslin. 


In the next picture, the sleeve on the right is not hanging correctly due to reducing too much cap-sleeve height. Ease-stitching is visible on the left because I un-reduced sleeve-cap height by another 1/4".


The above picture is the bad side. Can you see the big wrinkle running from the shoulder toward the inner wrist?. The sleeve looks too long but it is only because I was clenching my fist for no reason.
 
Better side :)
I will be good to go as soon as I finish transferring all the changes onto the pattern paper. I feel like I already completed the project but it is just the beginning. I cannot wait to work with wool/alpaca fabric I bought for this project.

Until next time, cheers to you all!